phpMyAdminで簡単に複数DBを接続する方法
前回のphpMyAdminのアップデート方法に引き続き、今回もphpMyAdminについて書こうかなと思います。
複数DBを一つのphpMyAdminで見られたら楽ですよね?
プログラミングやWordPressを習得するのに一番近道な方法とは?
複数DBを管理する方法
config.inc.phpファイルをちょこちょこっと書き換えるだけでいけちゃいます。
■config.inc.php
[code highlight=”36,37,38,39,40,41,42,43,44,45,46,47,48,49,50,51,52,53,54,55,56,57,58,59,60,61,62,63,64,65,66,67,68,69″]
/*
* First server
*/
$i++;
/* Authentication type */
$cfg[‘Servers’][$i][‘auth_type’] = ‘cookie’;
/* Server parameters */
$cfg[‘Servers’][$i][‘host’] = ‘hoge_localhost_1’;
$cfg[‘Servers’][$i][‘connect_type’] = ‘tcp’;
$cfg[‘Servers’][$i][‘compress’] = false;
/* Select mysql if your server does not have mysqli */
$cfg[‘Servers’][$i][‘extension’] = ‘mysqli’;
$cfg[‘Servers’][$i][‘AllowNoPassword’] = false;
// $cfg[‘Servers’][$i][‘controlhost’] = ”;
// $cfg[‘Servers’][$i][‘controluser’] = ‘pma’;
// $cfg[‘Servers’][$i][‘controlpass’] = ‘pmapass’;
/* Storage database and tables */
// $cfg[‘Servers’][$i][‘pmadb’] = ‘phpmyadmin’;
// $cfg[‘Servers’][$i][‘bookmarktable’] = ‘pma__bookmark’;
// $cfg[‘Servers’][$i][‘relation’] = ‘pma__relation’;
// $cfg[‘Servers’][$i][‘table_info’] = ‘pma__table_info’;
// $cfg[‘Servers’][$i][‘table_coords’] = ‘pma__table_coords’;
// $cfg[‘Servers’][$i][‘pdf_pages’] = ‘pma__pdf_pages’;
// $cfg[‘Servers’][$i][‘column_info’] = ‘pma__column_info’;
// $cfg[‘Servers’][$i][‘history’] = ‘pma__history’;
// $cfg[‘Servers’][$i][‘table_uiprefs’] = ‘pma__table_uiprefs’;
// $cfg[‘Servers’][$i][‘tracking’] = ‘pma__tracking’;
// $cfg[‘Servers’][$i][‘designer_coords’] = ‘pma__designer_coords’;
// $cfg[‘Servers’][$i][‘userconfig’] = ‘pma__userconfig’;
// $cfg[‘Servers’][$i][‘recent’] = ‘pma__recent’;
/* Contrib / Swekey authentication */
// $cfg[‘Servers’][$i][‘auth_swekey_config’] = ‘/etc/swekey-pma.conf’;
/*
* second server
*/
$i++;
/* Authentication type */
$cfg[‘Servers’][$i][‘auth_type’] = ‘cookie’;
/* Server parameters */
$cfg[‘Servers’][$i][‘host’] = ‘hoge_localhost_2’;
$cfg[‘Servers’][$i][‘connect_type’] = ‘tcp’;
$cfg[‘Servers’][$i][‘compress’] = false;
/* Select mysql if your server does not have mysqli */
$cfg[‘Servers’][$i][‘extension’] = ‘mysqli’;
$cfg[‘Servers’][$i][‘AllowNoPassword’] = false;
// $cfg[‘Servers’][$i][‘controlhost’] = ”;
// $cfg[‘Servers’][$i][‘controluser’] = ‘pma’;
// $cfg[‘Servers’][$i][‘controlpass’] = ‘pmapass’;
/* Storage database and tables */
// $cfg[‘Servers’][$i][‘pmadb’] = ‘phpmyadmin’;
// $cfg[‘Servers’][$i][‘bookmarktable’] = ‘pma__bookmark’;
// $cfg[‘Servers’][$i][‘relation’] = ‘pma__relation’;
// $cfg[‘Servers’][$i][‘table_info’] = ‘pma__table_info’;
// $cfg[‘Servers’][$i][‘table_coords’] = ‘pma__table_coords’;
// $cfg[‘Servers’][$i][‘pdf_pages’] = ‘pma__pdf_pages’;
// $cfg[‘Servers’][$i][‘column_info’] = ‘pma__column_info’;
// $cfg[‘Servers’][$i][‘history’] = ‘pma__history’;
// $cfg[‘Servers’][$i][‘table_uiprefs’] = ‘pma__table_uiprefs’;
// $cfg[‘Servers’][$i][‘tracking’] = ‘pma__tracking’;
// $cfg[‘Servers’][$i][‘designer_coords’] = ‘pma__designer_coords’;
// $cfg[‘Servers’][$i][‘userconfig’] = ‘pma__userconfig’;
// $cfg[‘Servers’][$i][‘recent’] = ‘pma__recent’;
/* Contrib / Swekey authentication */
// $cfg[‘Servers’][$i][‘auth_swekey_config’] = ‘/etc/swekey-pma.conf’;
[/code]
要は$iの部分をインクリメントして次のサーバ情報を記入!ということを繰り返せば良いわけですね。
ちなみに/* Storage database and tables */以降のコメントアウト部分はphpMyAdminの設定保存場所の記載ですので必要に応じて使用してください。
これで保存してphpMyAdminにアクセスしてみてください。
そうすると、、、
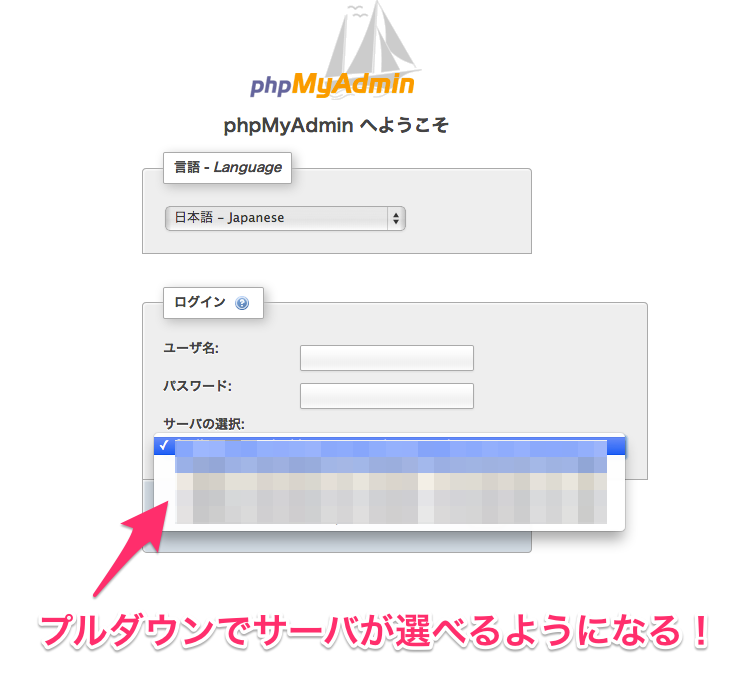
「サーバが選べるようになってる!」
はずです。
めちゃくちゃ簡単ですね^^